Smart Color-Changing RGBw Cafe String Lights
Download the Novolink Lightscape™ Holiday app (LS Holiday)
Apple Store: https://apps.apple.com/us/app/ls-holiday/id1527204884
Google Play Store: https://play.google.com/store/apps/details?id=cn.xang.fktwellight&hl=en
Instructions for connecting the Novolink Lightscape™ Smart Cafe String Lights
Thank you for purchasing the Novolink Lightscape™ Smart Color-Changing RGBw, 12-Bulb Cafe String Lights! After years of developing and manufacturing string lights that use Bluetooth® wireless technology, we’re proud to present this very special product.
Included here, you’ll find detailed information on the setup and operation of the Cafe String Lights, above what is coved I the QSG included in the package. This online format allows us to present up-to-date information for our customers, as well as emphasis particular aspects of the product based on feedback.
If you have any questions about the product, please feel free to contact our Novolink Customer Service at 1-800-933-7188 (10-5pm, M-F), or email us at cs@novolinkinc.com.
Warnings:
PLEASE READ BEFORE PROCEEDING
This string light set is not a toy. Keep out of reach of children. The light set should not be plugged in while still in the packaging. For indoor and outdoor use. Do not attempt to splice this light set to another light set. The electric cord cannot be replaced. Only use the included hardware and adapter.
If the string light is damaged or does not work properly, the whole unit should be replaced if under warranty, or disposed of in accordance with local, state and federal regulations.
WARNING – RISK OF ELECTRIC SHOCK. IF BULBS ARE BROKEN OR MISSING, DO NOT USE.
-
The total connected sets may not exceed the maximum allowed number of 2 extensions to an original set. If this limit is exceeded, it may result in a risk of electric shock or malfunction.
-
Ensure that the supply cord and inner wiring are not subject to mechanical load or stress.
-
Never hang or mount any object to the lightning chain.
-
Always disconnect the supply cord from the electrical outlet when the light set is not in use, or when the area where in use will be unattended for long periods of time.
-
For outdoor use, ensure the electrical outlet or any extension cord is in compliance with the protection class IP44 (splash and water proof). If there is any doubt, consult a professional electrician.
-
Each section of a connected light set must be mounted individually.
-
Dispose of an entire light set if any portion of it is mechanically or electrically damaged.
FCC COMPLIANCE
Contains FCC ID: 2APYD-850008271083
NOTE: This equipment has been tested and found to comply with the limits for a Class B digital device, pursuant to part 15 of the FCC Rules. These limits are designed to provide reasonable protection against harmful interference to radio or television reception, which can be determined by turning the equipment off and on, the user is encouraged to try to correct the interference by one or more of the following measures:
-
Reorient or relocate the receiving antenna.
-
Increase the separation between the equipment and receiver.
-
Connect the equipment into an outlet on a circuit different from that to which the receiver is connected.
-
Consult the dealer or an experienced radio / TV technician for help.
Changes or modifications not expressly approved by the party responsible for compliance could void the user’s authority to operate the equipment.
This device complies with Part 15 of the FCC Rules. Operation is subject to the following two conditions:
-
this device may not cause harmful interference, and
-
this device must accept any interference received, including interference that may cause undesired operation.
The Bluetooth® word mark and logos are registered trademarks owned by Bluetooth SIG, Inc. and any use of such marks by Novolink, Inc. is under license. Other trademarks and trade names are those of their respective owners.
Assemble the String Light Set
-
Remove the String Light Set and Controller from the box, and inspect for damage to the wire. If any damage is discovered, contact Novolink Customer Service at 1-800-933-7188 (10-5pm, M-F), or by email at cs@novolinkinc.com
-
Locate the male plug end of the String Light Set, and the female receptacle end of the Controller. The receptacle may be covered by a cap. If so, unscrew the cap counter-clockwise to remove.
-
Connect the male plug to the female receptacle, and screw the securing cap on the plug side onto the receptacle threads in a counter-clockwise direction until it is tight and secure.
-
We’ve added a plastic film over each of the acrylic bulbs to protect them during shipping. This should be removed before the String Light Set is placed into regular operation. You may opt to remove the film from each of the LED acrylic bulbs during assembly.
-
You can connect up to three (3) String Light Sets to one (1) Controller. If you have additional sets, attach them to the first set by the following process:
-
Remove the protective cap from the end of the first String Light Set to expose the female receptacle end.
-
Take the male plug of the second String Light Set, and connect to the receptacle end of the first set.
-
Thread the securing cap of the plug side of the second string onto the receptacle’s threads in a counter-clockwise direction, until it is tight and secure.
-
Repeat the above steps for the third String Light Sets.
-
-
When finished adding String Light Sets, make sure to secure the receptacle cap.
Download and Register with the LS Holiday app
The String Light Set can be operated by the LS Holiday app (available for both iOS and Android based smartphones and tablets with Bluetooth® wireless technology) or the attached Controller.
To download the LS Holiday app for Apple iOS, go to the following link in the App Store:
To download the LS Holiday app for an Android device, go to the following link in the Google Play Store:
Sign Up
-
If you do not have a Novolink account for either the Novolink LS app, or the LS Holiday app, select ‘Sign Up’.
-
Enter your email address (make sure you have access to your account), and click to agree with the app’s Terms and conditions for use.
-
Press the Get Verification Code button, and a 6-digit code will be sent to your email address from Novolink (novolink@novolinkinc.cn).
-
You will have 60 seconds to enter the verification code into the app. (Don’t worry, if you miss the verification window, you’ll be asked if you’d like the email re-sent with another code.)
-
Once you’ve successfully entered the code, you will have to set a Password for your account.
-
Your email address and password will be automatically entered into he Log in screen. Press the advance arrow to continue to the app.
-
(You may be asked to give permission for the LS Holiday app to access Bluetooth. Please select ‘OK’ to enable the function.)
-
The app is ready to go! (Remember, whenever you use the app, make sure the Bluetooth® wireless connection is active.)
Test light set before installation.
Before installing the light String Light Set(s) in your home, patio, etc., it’s recommended to test them to insure the LED bulbs and Controller are working, and that a proper Bluetooth® wireless connection can be established.
-
Plug-in the Controller to any standard AC outlet.
-
The red indicator light on the Controller will flash rapidly, indicating that it is ready to be connected to the LS Holiday app. The bulbs should also be ON and cycling through a series of colors. This is a good opportunity to check that each bulb is functioning properly. If there are a set of lights that are not ON at this moment, check the AC outlet is working, and plug/receptacle connections are secure.
-
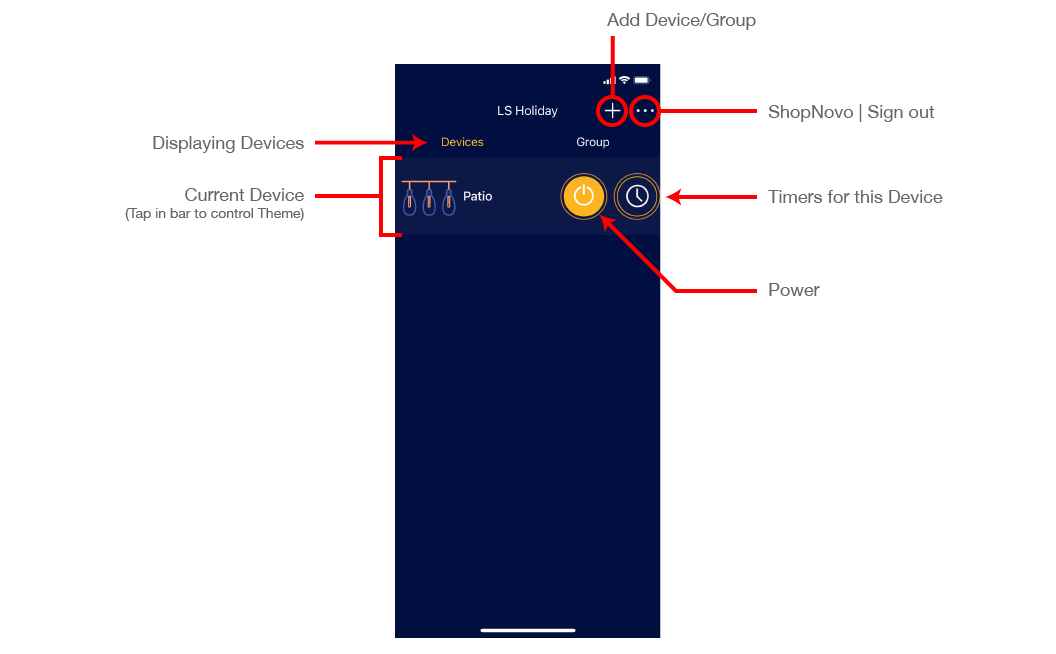
Open the LS Holiday app, and go to the main screen with ‘Devices’ and ‘Group’ at the top. If it is not already selected, select ‘Devices’, then ‘Add Device’ at the bottom of the screen.
-
In the ‘Add Device’ screen, look for the ‘Cafe Light’ square icon. There should be a yellow circle, with a number, inside the icon. This shows that one or more light strings are ready to be connected via Bluetooth wireless connection. Tap on the icon.
-
You will be asked to provide a ‘Device Name’ for the light string. You can create any name for the set (ie. Patio, Front Yard, Party).
-
In the next screen, you’ll see the light string displayed aside a couple of icons. To turn ON the light set, tap either the device name, or the ON icon.
-
The next screen will display the current running theme for the lights, and this should be reflected in the light string colors/patterns.
App Screen Layouts
The Main Device Screen
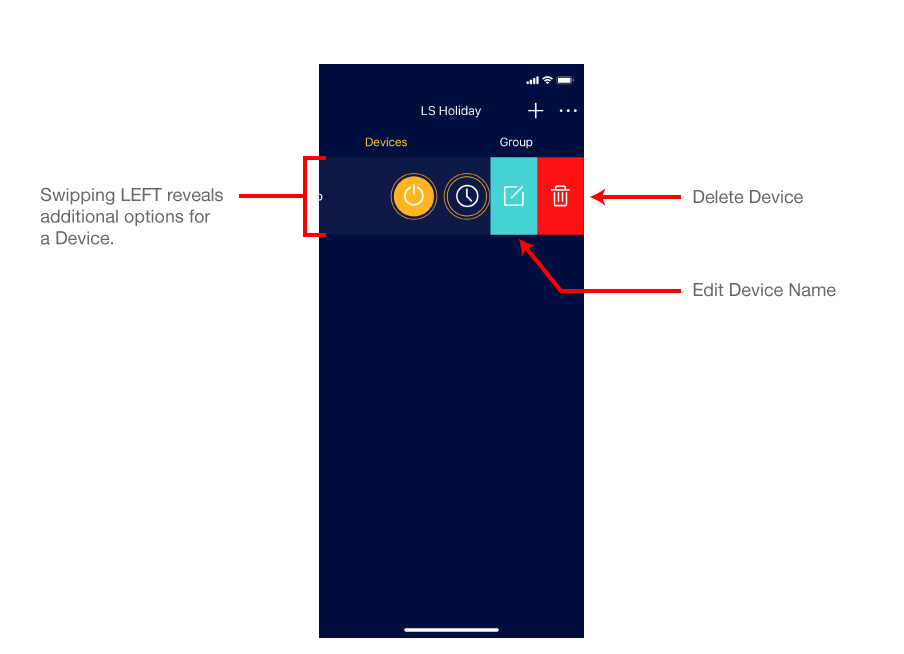
The Main Device Screen - Edit
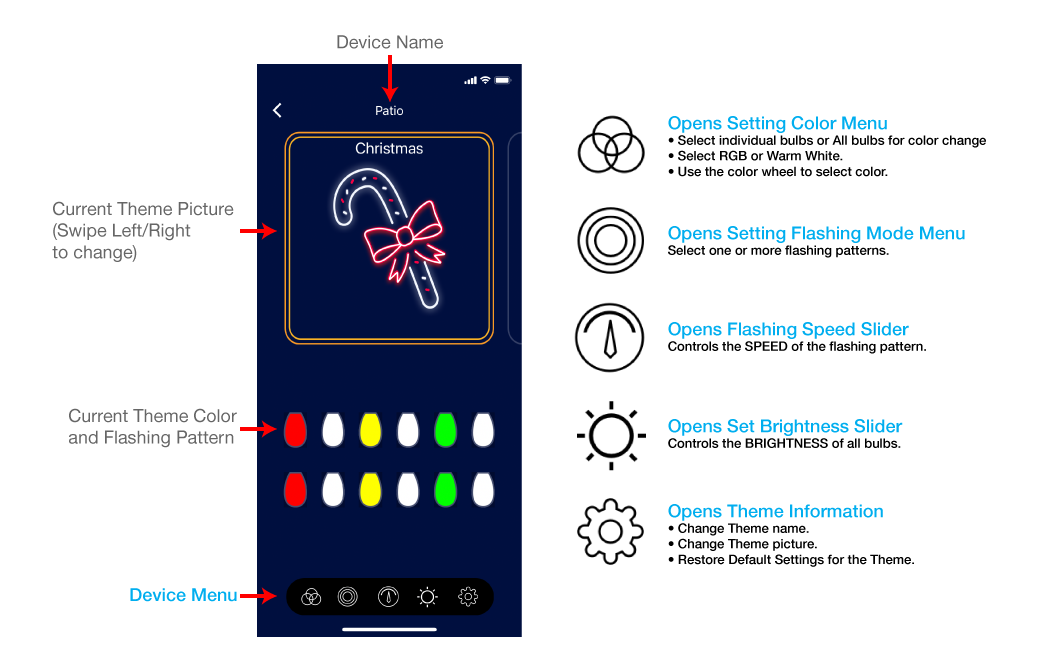
Theme Screen
Color Setting Menu Pop-up

Additional Pop-ups
Timer Screens
Using the App - Selecting Themes and Colors in the App
Use the Color Wheel, under the Theme Picture, to change the color for one or more of the LED bulbs in the string, or for an entire STRING SET.
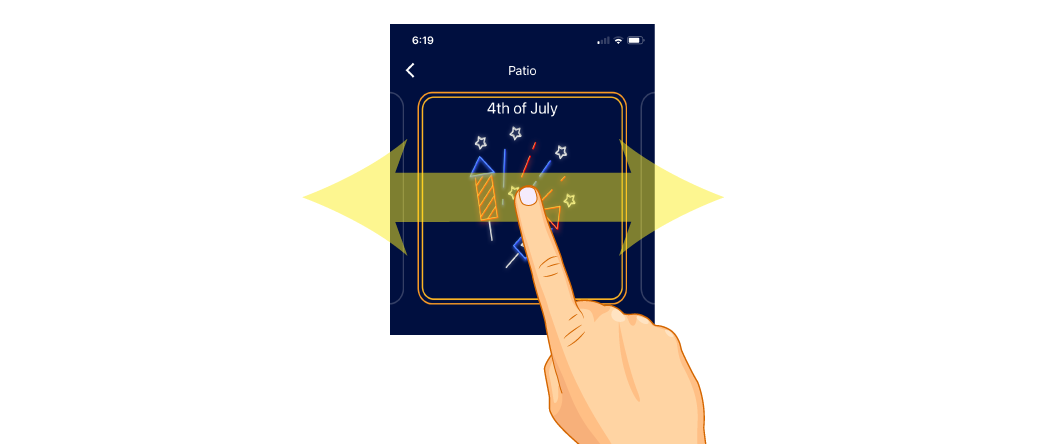
Select a Theme
The LS Holiday app includes 8 preset and 3 custom themes, including: Christmas, Halloween, Easter, St. Patrick, Valentine’s Day, 4th of July, Hannukah, and Cinco De Mayo. Swipe left/right on the Theme Picture to select a theme.
Changing Individual Bulb Color
-
Go to a Theme and select the Bulb Color Adjustor icon. This will open the ‘Setting Color’ menu that contains the Color Wheel and Blocks.
-
Move the Bulb Slider left/right to see all available bulbs. Tap on one or more of the numbers above the bulbs to select those bulbs for color changing (the number will be highlighted in yellow.)
-
Move your finger along the Color Wheel to select an RGB color for all highlighted bulbs.
-
You can fine-tune your selection in the Color Block, which shows variations of the currently-selected color.
-
-
To select a Warm-White color, tap the white circle with the ‘W’ in the middle of the Color Wheel. As with RGB, you will select a color temperature of white for those selected bulbs.
Change All Bulbs to the Same Color
-
In the ‘Setting Color’ pop-up, select ‘All’ in the Bulb Slider. Note that all the numbers above the color bulbs are highlighted.
-
Select a color from the Color Wheel, Color Block, or the white circle with the ‘W’ in the middle of the Color Wheel.
-
When a color is selected, you’ll see that all the bulb colors in the Bulb Slider change to that color.
Once selected, changes in color will automatically update on the light string.
Using the App - Selecting and Adjusting Patterns and Brightness
Changing the Flashing Pattern
-
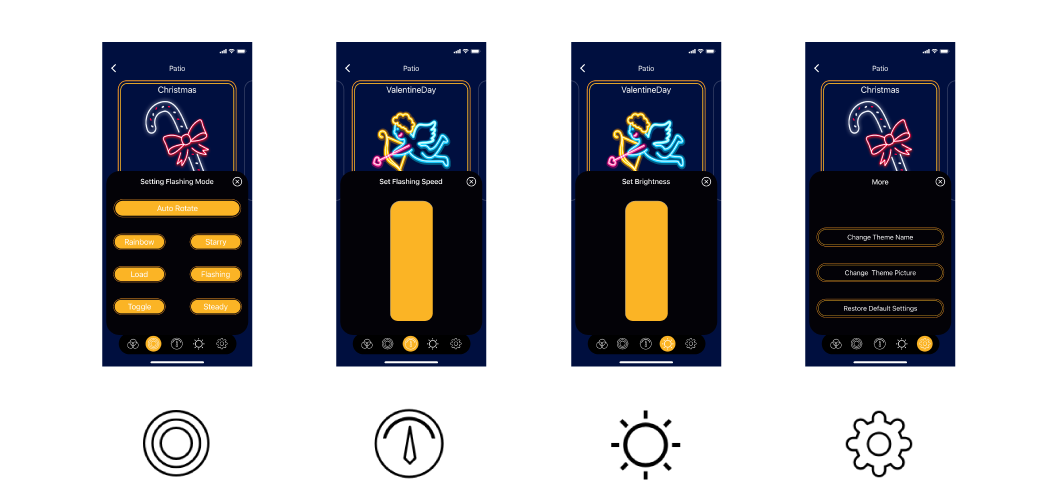
Select the Flashing Mode icon [Icon] at the bottom of a Theme screen. This will open the ‘Setting Flashing Mode’ pop-up.
-
There are 5 flashing light patterns, and a Steady option that will simple turn ON the lights. Select one or more of these options, or select ‘Auto Rotate’, which will run through all options accept Steady.
Change Flashing Pattern Speed
-
Select the Flashing Speed icon [icon] at the bottom of the Theme screen. This will open the ‘Set Flashing Speed’ pop-up.
-
Increase/decrease the speed of any of the flashing patterns by adjusting the speed bar up/down.
Changing Light String Brightness
-
To adjust the brightness of the STRING SET, select the Brightness icon [icon] at the bottom of the Theme screen. This will open the ‘Set Brightness’ pop-up.
-
Increase/decrease brightness by adjusting the brightness bar up/down.
Changing and Restoring Themes, and original Theme Colors
You can change the name of any of the Themes, and replace the Theme Picture with an additional 4 available in the app.
To change a Theme’s name, select the Theme Editor icon at the bottom of the Theme screen. Select ‘Change Theme Name’, and enter the new name. Note that the app will not accept spaces or special characters, and must be alpha-numeric. Once entered, select ‘Change’ to update.
To change a Theme’s picture, select the Theme Editor icon at the bottom of the Theme screen. Select ‘Change Theme Picture’, and tap on one of the available images. These currently include: Birthday Celebration, Fanfare, Sports, and Mardi-gras. Select ‘Save’.
To revert back to a theme’s original name, picture and colors, select the Theme Editor icon, and ‘Restore Default Settings’. Confirm this selection, and the currently active theme will revert back to its original settings.
Using the Timer Feature
Novolink Lightscape Cafe String Lights can be set to up to 3 independent timers. Note that the timers will only activate/deactivate the lights, and will not change the light color or pattern.
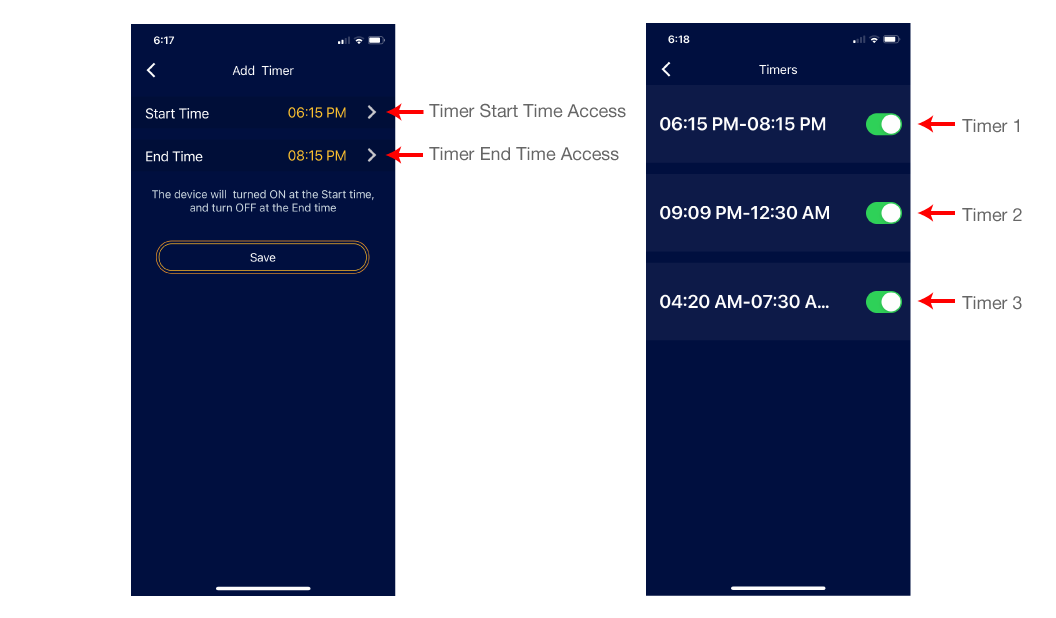
Create/Change a Timer
-
From the main screen, select the Timer icon from the Device you wish to work on a timer.
-
At the bottom of the next screen, press the ‘Add Timer’ button.
-
In the ‘Add Timer’ screen, select a ‘Start Time’ by tapping on the time in yellow, or the arrow. Adjust the time you wish the STRING SET to turn ON at the bottom of the screen. Select ‘Save’, or tap the screen when done.
-
Select an ‘End Time’ by tapping on the time in yellow. Adjust the time you wish the STRING SET to turn OFF at the bottom of the screen. Select ‘Save’, or tap the screen when done.
-
Important: Make sure the Start Time is BEFORE the End Time, or the lights will turn ON for an extended period of time.
-
Once you have confirmed the Start and End times, press ‘Save’. You new timer will display in the ‘Timers’ screen, and be toggled to activate.
Turn a Timer ON/OFF
You can activate/deactivate a timer simply by pressing the toggle button alongside the displayed time. If the toggle is GREEN, it is active; if not, it is not active.
Creating Groups of Light Sets
If you have multiple Cafe String Light sets with Controllers, you can create Groups. Groups allow for singular control of multiple connected devices.
To create a group:
-
Make sure all connected devices are plugged-in and powered ON. The app will need to register all devices you intend to group via their Bluetooth® wireless connections.
-
In the LS Holiday app, go to the main screen to see the all connected devices are visible in the ‘Devices’ list.
-
Select ‘Group’, and then ‘Add Group’ at the bottom of the next screen.
-
In the ‘Add Group’ screen, you can select any of the available devices by tapping on the circle and making it yellow. When finished, tap ‘Next’, and give the Group a Name (ie. Garage Lights, House Lights)
-
All the devices you have added to the group now have a singular control. You can designate a theme, change color and apply timers that will affect all connected lights in the same manner.
Installing Light Sets
When installing STRING SETs, remember that they will require connection to a protected and appropriate GFCI outlet. String lights should be mounted to a solid and supportive structure or surface, such as a beam, stud, or pole.
Each bulb in the STRING SET has a universal keyhole, which allows multiple ways in which a STRING SET can be hung.
-
Using a nail or screw
-
Using a light mounting hook
-
Using a cable loop
When mounting is complete, insure that the cap is secured to the receptacle on the unused end of the string. Proceed to plug-in the STRING SET, and test again using the LS Holiday app.